EPIC.png

This Is Epic

A curation of our design ideas and inspirations for houses in Goa, contemporary art and architecture.


Posts in Nivim Project Update
Week 95: Diwali Postcard from Nivim Goa

Living room front facade

Here we are close to week 100 of construction and closing in on completion. These are some photos from last week that we thought we will share in the festival spirit to get you excited about the soon-to-be final product.

We had a friend visit the house a few days back and he said that the trees appear as if they have been planted in place after the building is built. Keep in mind, the trees that he was talking about are the 13-14 existing full grown trees that have been carefully integrated in the site planning and building design for the house. Knowing that, his comment was a great validation for our efforts and hopefully the success of achieving our core concepts. 

View of the master bedroom among the trees

View of the sunset from the master bedroom deck

Partial view of the roof among the trees

Continue reading more updates for the project.

Week 94: Pavilion Block

View of the pavilion block from the main house with the driveway on the right

After much attention has been paid to the main house, we have decided to do an entire post on just the pavilion block. To refresh your memory, the house is planned in a L-shape configuration, with the main house sited at the back of the site, also the highest point on the site with a separate pavilion block that is located adjacent to the pool and is connected with the main house through a series of courtyards. (See previous post of Site Planning Concept)

View of the pavilion block from the access road. The idea is to have this translucent box be the only elevation seen from the road, that gives the idea of what lies within but maintains the privacy of the main house

The pavilion block is designed to create spaces that have the ability to be even more open than the main house and offer flexible use based on the whims of the owner depending on need, season and/ or time of day. As required, it can function as a separate guest cottage; or an inspiring office; workshop space; a pavilion to the pool, or entertainment space.

Following the theme of grand (and barefoot) luxury in the project, the pavilion block is an expanded version of a typical pool pavilion. It is comprised of a separate bedroom, bathroom and covered sitting area, and is located adjacent to the swimming pool. It is designed to be an airy pool pavilion and at the same time can be the fourth bedroom when needed or used as an independent guest cottage that can maybe be used by friends when the owners of the house are not around and the main house is locked and unavailable for use.

View of the pavilion block from across the pool with the existing trees in the pool deck

The general design of the pavilion follows the design vocabulary of the main house. It is a linear block that appears to float from the pool deck. We have chosen to leave most of the steel structural frame and the underside of the aluminium roofing exposed to give the pavilion a more raw-authentic feel. The doors are a combination of sliding wood and glass panels along with some wood louvers.

View from the pool deck with the louvered pavilion block 

Other things that we love about the pavilion block are the old existing trees that have been retained between the pool and the pavilion. These trees provide relaxing shade, play of light, bring birds and butterflies and provide excellent visual drama from the pavilion block. For the flooring of the pavilion block, we have chosen to do a combination of wood (in bedroom) and grit finished terrazzo (in sit-out and bathroom). This flooring once again provides the textural element to the pavilion that is meant to bring it closer to nature. Lastly, the bathroom in the pavilion is extra special and we are doing something very exciting there… but I think I will not let the secret out just yet and put up a photo when it is completed.

Continue reading  more updates for the project.

WEEK 90 - Glass, hardware and closing it up

We have come so far... Now when I look at the previous construction updates and old pictures, I find it hard to believe that we are almost ready to be finished. At this point, we have installed most of our glass and door hardware. As we speak, the plumbing fittings are going up along with final electrical wiring and switchboards. Hopefully, after this, we will be only left with applying final paint and polish to stone and IPS in floors and walls.

Living room opening detail with find glass, louver and mosquito net detail. See photos of the stage when we began framing this opening and how far we have come. 

Detail of our main entrance door to the living room with is pivoted from the center

Majority of the glass used in the house is toughened that enhances the safety and security of the openings. We have also used solar control glass in the east and west facing openings to reduce heat intake when the sun is lower and not easily protected by horizontal shading devices.

Along with the main house interiors, we are also busy with completing the pavilion block and the outdoor landscaping work. More on that soon..

View of the LHS Bedroom and Master Bedroom with all openings completed

Pavilion block from the driveway with service area below. Loving the shadow of tree on the building !

The bathrooms are also coming together great. See photo below of glass being fixed in the bathrooms. I promise a more detailed report on only bathrooms soon too...

Glass fixed to the master bathroom using patch fittings. On the right is the corner of outdoor tub in the master bathroom

Continue reading  more updates for the project.


Week 88: Our building material palette!

Here is a graphic that lays out the dominant textures at Nivim Goa. All mostly natural selected to make the house a variation of the nature surrounding it and not stick out like an aberration.

Read about more our interior finishes in the last project update.

Continue reading more updates for the project.

Week 87: Introduction to interior finishes and flooring

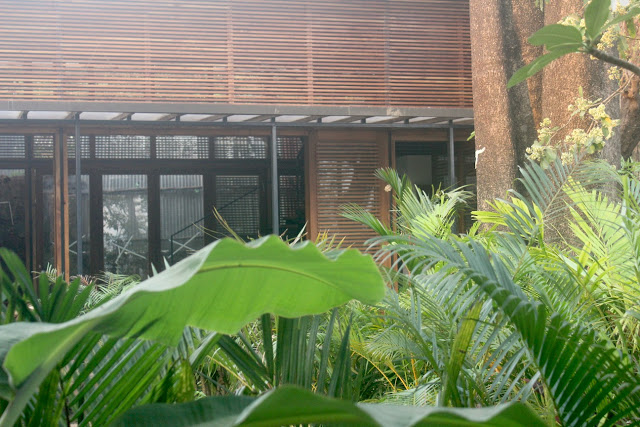
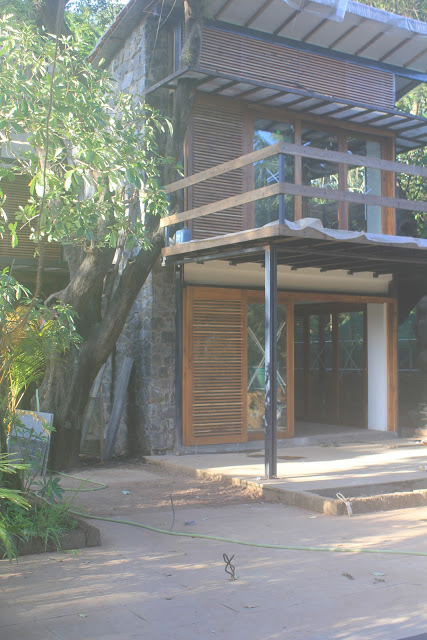
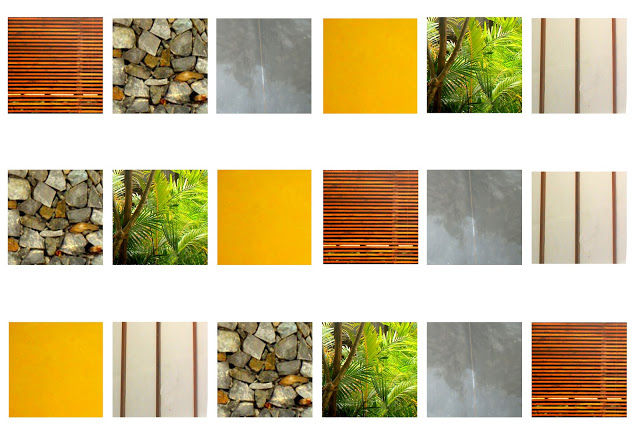
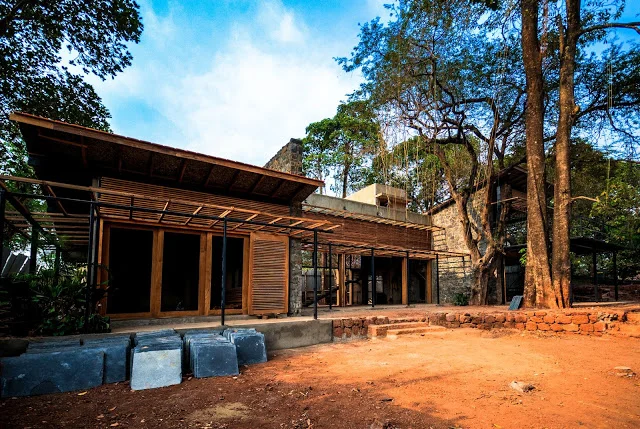
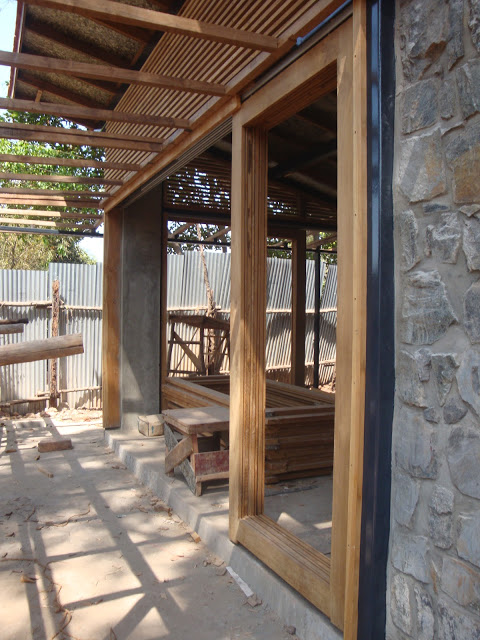
Living room and front verandah with black kuddapuh stone flooring, exposed basalt stone and wood, our predominant interior material palette with the natural green outside

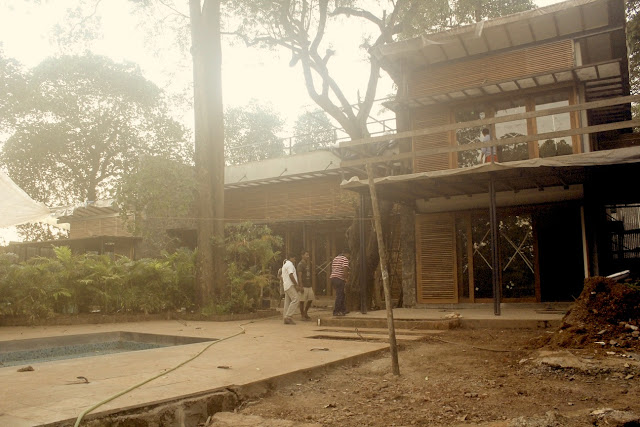
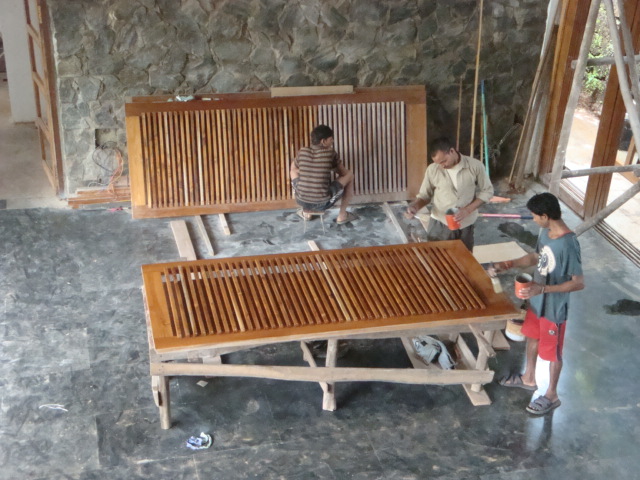
Last few months, with majority of the woodwork out of the way, while polishers polish the lovely wood, we have been busy with the various flooring and stone cladding details. This also works with the on-going monsoons that limit our ability to work outdoors.

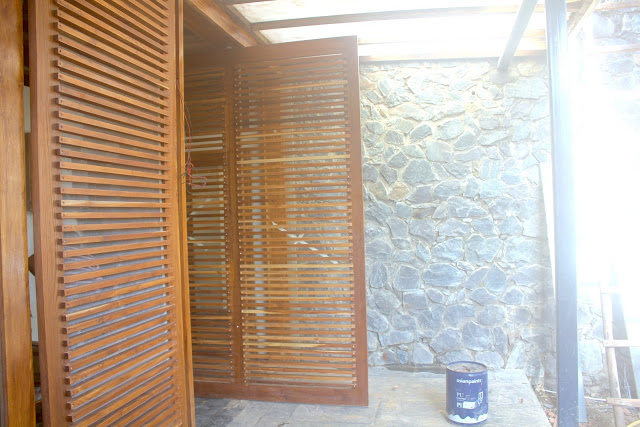
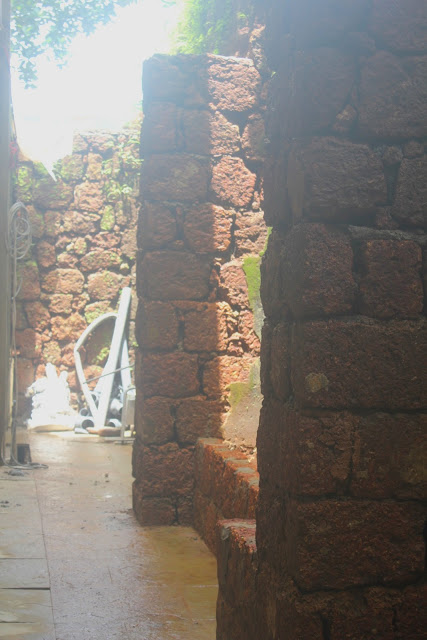
For our interiors, we wanted to continue with the contemporary tropical style of the house and provide finishes that are earthy, natural while still being streamlined and modern. In synergy with the house's concept of 'reconnecting with nature', the interior finishes are designed to have varying textures that can be seen visually and felt upon touch. We also wanted to have similar finishes indoors and outdoors such that the verandahs and courtyards feel like an extension of the interior rooms. Lastly, since we already have the exposed basalt walls, the wood screens and wood/ glass doors, we wanted to keep the finishes simple. Famous architect Meis van de Rohe said 'Less is more'. We truly believe that it is very easy to over-design, and the real excellence in design is achieved by exercising constraint, when a designer can do just enough to make things close to perfect and not over-embellish in an attempt to be safe. I have to at this point also quote Coco Chanel, who famously said that 'when accessorizing, always take off the last thing that you put on'.

Following this direction, we chose to keep our interior palette simple and limited to natural stone, wood, some metal (brass and steel), exposed cement and white paint. The grey cement and white paint finishes are meant to provide a canvas for the furniture, interior lighting, wall art and other accessories without over-crowding the room with too many elements demanding attention. We also steered clear of using imported stone or tiles as we preferred to use locally available materials that require considerably less energy use in transportation.

View of the living room with black kuddapuh flooring while carpenters polish the screen doors in the space

For flooring in the living room, we have chosen black polished kaddapuh (a widely available local stone) that extends to the living room verandahs, only here the stone is left in rough finish. So visually it looks like the same space but there is slight difference in texture if one choses to walk barefoot.

(A side note about the whole 'walking barefoot' connotation, we have designed Nivim with the thought that the residents would use the space to slow down from the daily city craziness, and allow the space to offer inspiration, calm and happiness…)

The black floor in the living room is dramatic and the smooth polish finish will provide the perfect backdrop for the oversize furniture pieces that this grand space demands.

View of the newly finished grey IPS flooring in the bedroom against the exposed basalt stone and wood

In the bedrooms, each room has one exposed basalt stone wall and two walls with wood screens and glass sliding doors. Hence, we have kept our floors simple with grey IPS in the ground floor bedrooms and yellow in the master bedrooms. The IPS cement floors are earthy that stay cool, require little maintenance and age beautifully overtime. To add a modern edge, we have chosen to inlay brass strips into the floor. These strips criss-cross the rooms in seemingly random directions providing a playful little detail along with the touch of additional luxury through the addition of metallic gold.

Detail of the brass inlay in the IPS cement flooring in bedrooms

The bathrooms are a composition in rough kadapuh, IPS cement, glass and planted exterior courtyards. These require a separate post which will follow soon. Until then enjoy some photos of other jobs being completed on-site. Cheers !

Polishing the living room fixed screens

Hanging the sliding doors in the living room

Rear verandah of the living room

Detail of the old laterite wall from the original structure that has been preserved as a backdrop for the living room and as a homage to the history of the site

Continue reading more updates for the project.


And, we are back ...

We are back !! After another sojourn to NY this time with a side trip to California as well ! A lot has been keeping us occupied at Nivim. Soon to follow this post are posts on the final stages of the construction at Nivim, the flooring, bathrooms, landscaping, etc etc...

Photos from top-left: Julia Pfeiffer Burns Park at Big Sur, CA; Fresh organic carrots; Lavender fields, Sonoma, CA; Wildflowers, Pacific Coast, CA; Vineyards, Sonoma, CA; Bright organic rhubarb; Artichoke flowers; and Cabin in the redwoods, Big Sur, CA

Newsbreak: Architectural Photos, finally !!!

We are elated to present to you pre-final photos of Nivim Goa from last month.

CLICK ON LINK for fullscreen photos.

Be sure to click on the 'fullscreen' icon on bottom right. 

Shot in April, these photos show the house just before the final finishing stage. We began construction on the house end of January 2011. The core principles of the house is to promote architectural excellence and environmental sustainability.

We are now about 2-3 months away from finishing. We are aiming for the 'Gold' level green homes certification from the Indian Green Building Council and will be the first home in Goa to be certified. Read more on the green initiatives at Nivim Goa.

As for architectural excellence, we have attempted to create spaces that are inspiring, use natural materials and design building openings that all together enhance the user's relationship with the environment. Read about our design concept.

The photos above give the feel for the raw architectural space and materials, and show the bare building that is not hiding behind any fancy finishes or landscaping.... Do see the pictures and we will let you be the judge of how far we have succeeded in achieving our goals.

See all the design and construction updates for Nivim Goa.

All photos courtesy Sanjeet Wahi, Photographer, Delhi.


Week 74: Part III - Is wood a green material?

Old teak wood beams found with a Mumbai vendor

While using wood, an important question for us was to determine whether we would consider wood to be a sustainable material or not. Wood is a naturally occurring renewable material and hence can be considered sustainable. The issue is the over-logging of forests worldwide leading to loss of critical forest cover and all the resulting problems of loss of habitat, environmental disastors and climate change. This problem can be somewhat overcome by buying wood that is certified to come from forest following sustainable forest management practices. When we began our search for wood, we did our research and found that there was only one certified plantation in India that sold only rubber wood. Most other certified wood is actually imported to India. This results in spending large amounts of energy in transporting the wood across continents to finally arrive in India.

The solution we arrived at was to use reclaimed wood, that is to reuse wood reclaimed from old buildings, bridges or railway sleepers in our building. For this purpose, we conducted several trips to Delhi and Mumbai and identified a vendor who promised us a stock of old Burma Teak wood that had been used in buildings during the British times. The deal was struck, advance payment made but then it turned out (which happens often) the vendor had over-promised and would under-deliver…. Stuck at the last minute, we were forced to make a decision while keeping cost, time and quality all in check. The decision we made was to use virgin Burma and African teak wood in the project.

Luckily, we were able to source some old teak and matti (local variety) wood from Goa itself. We bought wood that was used in old homes as roof rafters and floor beams. The advantage of using old wood is that it has completely dry or seasoned, has achieved its equilibrium moisture content and therefore presents no danger of bending or warping. And once you shave off the top weathered layer, the wood looks and behaves as good as new.

Stack of old reclaimed wood brought to the site

Carpenter working with old wood to remove nails or any sections that are spoilt

Carpenter working with old wood to remove nails or any sections that are spoilt

Cutting the old wood to remove the outer weathered layer and to make usable sections

Cut old wood, look as good as new !

The challenge of using old reclaimed wood apart from sourcing it is actually working with it. The wood from roof rafters often has nails some of which have lost their heads, and therefore it is difficult to predict where there is a nail within the wood section. This creates a problem while cutting the wood, as an unexpected nail can break the blade of the saw, leading to additional cost and time lost in replacement.

In addition, a lot of time is spent is preparing the wood, in sorting it based on size and variety, cutting and disposing any sections that are damaged and also carefully examining the wood to remove any nails or other intrusions. This takes time and labor cost. Also, as one would expect carpenters would much rather buy new wood and straight away begin work rather then spend time in preparing the wood before crafting it.

In any case, we went through all the motions of figuring out the process and executing it. The result is some beautiful wood that we are reusing and saving a few trees. Also important to note is that in the end, the cost of using old wood come to be more or less the same as new wood due to the additional cost in working with it and high wastage but ofcourse there are significant environmental savings that are difficult to quantify.

Back to Part I - Romancing Wood, an introduction to our choice for using wood, and Part II - Seasoning and treating wood

Week 74: Part II - Seasoning and Treating Wood

Wood stacked outside the kiln ready for drying

We did a lot of research and determined best practices while using wood. To avoid the common problems with wood, we sourced tree logs that had been lying with the saw mills for a year or two so they were air-dried. We then took this wood and got it kiln dried (or seasoned). In this process, the wood is kept in a kiln for 15 days at controlled temperatures to dry the moisture in the wood. Kiln-dried wood is dried to a moisture level of around 15%.

Wood will always retain some level of moisture, the moisture content is highest when wood is freshly cut and it reduces as wood dries over time. As wood dries, it shrinks and that results in the bending of wood. If the moisture content in atmosphere is high then wood may absorb some of this moisture and expand. Hence, the jammed doors during monsoon. But over time, wood reaches an 'equilibrium moisture content (EMC)'. Once this point is reached then wood does not react noticibly to changes in moisture content. Kiln drying accelerates this drying process. EMC varies with type of wood, local weather conditions, etc. A moisture content between 12-15% is found to be close to EMC in areas of high atmospheric moisture.

Photo of the kiln while it is drying our wood inside

The temperature controls at the kiln

Engineer at kiln checking the moisture content using a moisture meter

Now for wood that is used outdoors there is always the danger of rot. This danger is most prevalent if wood is used close to the ground level where it can potentially be prone to water logging. We have dealt with these problems by avoiding the use of wood for decking on the ground and providing ample slope elsewhere to prevent any water logging.

Then there is the danger of attack by termites and other wood boring insects. This problem is somewhat negated by use of stone/ concrete foundations and plinth, materials that termites cannot pass through. In addition, we have chosen to use primarily teak wood that is known to be naturally resistant to termites. As an additional layer of protection, we are treating all our wood with rot and termite resistant chemical before use in the project.        

Finally, there is the important question of sustainability while using wood. More on that in Part III of this post. Back to Part I with introduction to our choice of using wood.

Week 74: Part I - Romancing wood

Now in the final stage of construction, we are concentrating on final finishes. That means that our civil work is done and so is most of our woodwork. We are now laying the floors, polishing the wood, tiling the pool and getting ready for planting.

A significant milestone is completing the woodwork for the main house. As you can see in the more recent photos of the house, we have used wood quite liberally. The main reason is the design of a very open home that allows the indoor to connect seamlessly with the outdoors. The resulting large openings in the house (every room in the main house has two walls that completely open) need frames and doors, hence the large scale use of wood. Also in the construction of the house, we have tried to reduce the use of RCC due to the carbon emissions associated with cement production. In addition, typical RCC construction over large spans tends to result in sections that are thick and heavy. Instead we wanted a structure that looked light and was able to blend into the surrounding and not be a big block of concrete that has been dropped thoughtlessly on the greenfield site. The resulting material of choice was structural steel and wood.

View of the LHS bedroom with the woodwork for the screen, door opening, roof and chajja

View of our amazing carpenters fixing the screen louvers in the front and back of living room

View of LHS bedroom with the sliding doors all in Burma Teak

I am a sucker for wood. Its warm golden colour with the natural grain adds a rustic quality to the design that is hard to replicate with another material. Aluminum (which was the other material that we considered for doors instead of wood) on the other hand feels relatively cold to touch, look and feel. Wood ages well, it grows old with elegance. 'Fetishisation of wood' was a trend that stood out at the Milan Furniture Fair,this year where designers promoted the use of natural finished wood rather than lacquered or painted finish. Another interesting trend that is catching on worldwide is the use of reclaimed wood, recycling the material instead of using virgin wood to avoid the cutting of the fast disappearing forest cover.

View of stacked doors waiting to be installed in various rooms

Of course wood is also a very temperamental material to use. It tends to change shape as it dries, is attractive to insects and can rot with excessive moisture. Wood is most feared when used outdoors. But then it has been the material of choice for building high-end boats and bridges for ages. All in all, I have found that wood is often mis-understood. It is the material that has been used the longest in construction. There are the obvious dangers of using wood but these risks can be mitigated by understanding it's properties and working with them. Using wood in construction is like using silk for a beautiful couture dress, there is a specific way of working with the material and the effort is worth it as the result can be priceless.

Look out for: Part II of this post where we will discuss our efforts to treat wood, and Part III where we discuss sustainability aspects of using wood.